
Still confused about what to do or what to get?
Remember that a good rule of thumb for choices for a beginner's sailplane typically have been planes whose wings span about 2 meters (about 78 inches) or a bit shorter. These planes also only use rudder and elevator for control surfaces and require only 2 channels of radio control for control surfaces.
I found interest the first time visited the San Diego area in California known as La Jolla in the late 1970's. There's a very famous slope soaring hill above Black's beach known as Torrey Pines [Glider Port], near the Scripps Institute. My Grandfather was taking me to different colleges and other places so I'd get an idea of the different places I could go to school and some great places to work (like the Scripps Institute). His mistake was taking me to Torrey Pines. I saw a purple slope plane that was obviously scratch-built as there weren't any kits like that in those days, and flew like no plane I'd ever seen before. High speed passes, multiple rolls, inverted flight, etc. That was enough for me, I just had to do it, go build and fly my own R/C glider!
In those days, we didn't have the Internet to research R/C planes, so visited a local hobby store and saw all the kits they had
to offer and asked the store owner for info about what to get. Luckily for me, he
actually answered my questions and didn't force me buy something I shouldn't. Instead,
he pointed me at a beginner glider known as the  Airtronics Super Questor and told me to get
a 4-channel radio (a Futaba, the very first Futaba radio) right at the start rather than
the 2-channel, 2-stick cheapo radios that are hopefully not still available. I bought the plane
that day, but I had to save up for the radio as it was more than $150 (in 1973), and
that was a lot of money for a teenager! Interestingly enough, they still cost about the same today...
Airtronics Super Questor and told me to get
a 4-channel radio (a Futaba, the very first Futaba radio) right at the start rather than
the 2-channel, 2-stick cheapo radios that are hopefully not still available. I bought the plane
that day, but I had to save up for the radio as it was more than $150 (in 1973), and
that was a lot of money for a teenager! Interestingly enough, they still cost about the same today...
There used to be a lot of hobby stores out there, but it difficult hard to find a good one now. Most of the stores I've visited over the years have knowledgeable people in them, but aren't very helpful and actually seem insulted when you ask seemingly stupid questions. If you feel like you're being treated that way, find another store or resource. I don't understand this kind of business practice. Seems to me that if I wanted you to buy things in my store, I'd be helpful so you'd come back and buy more stuff.
I took my new Super Questor plane kit home and my mother graciously allowed me to build it on the kitchen table (Thanks Mom!). Of course, I had no idea how to really build it, so I followed the instructions in the kit. This was and IS a good idea, especially with all the modern kits that are available today. Most of the best kits out there are kits that were originally developed from scratch-built designs by 'regular r/c flyers' and then painstakingly turned into kits so that others could enjoy their designs. Most of the smaller 'kitters' today don't make much money on their kits, but do it as a service to the hobby and allow them to 'justify' all that time they spend building and flying (i.e. their spouses let them hang out in the garage all night long because it's a 'business'!). Sounds like a good business to be in, doesn't it?
Once I had build most of the kit, I purchased my radio. The first thing I did, and you should do as well, was to charge up my batteries (make sure your first radio comes with rechargable batteries too! Most do, but be sure and ask before you buy), plug in the servos and 'fiddle' with your new radio. What I mean by this is that you should turn on your radio as if it was installed in your plane and move the transmitter 'sticks' back and forth and see how the servos move back and forth as you move the sticks. This will familiarize yourself with what each stick on the transmitter does and what channel 'goes' with what stick. Remember that you want to have the servos hooked up to each control surface and when you move the stick for the rudder, the rudder will move in the same way that the servo moves. If you've purchased a quality radio, there will be switches on the transmitter that control a feature known as servo reversing. This is a very useful feature! If you install the servos in your plane so that the control surface, such as the rudder, moves backwards in respect to the movement on the transmitter. No problemo!, just switch the switch for the servo you want to reverse and 'bingo', problem solved.
Installing the radio: Follow the kit's directions! Really! What I usually do when I get most of the plane done is to put the radio's receiver, battery pack, and servos into the fuselage in the approximate mounting locations and see how close to the plane's balance point (the center of gravity or C/G) you are with the radio you've bought. It is VERY important to get the planes C/G point at the point indicated in the plane's instructions. It may be necessary to even add weight, like some lead or other heavy substance to the nose of your plane to get it to balance correctly. The best situation is where you don't have to add any weight to get the plane to balance (especially in a handlaunch plane, as weight is always a problem). This way you can keep it as light as possible. Don't worry too much about whether one wing is heavier than the other, just concentrate on getting the nose-to-tail C/G as close to what the kit calls out. If you find that the plane seems heavy in the front (a 'nose-heavy' condition, this doesn't happen that much) then you can usually mount your radio back a bit from the nose, or put the servos under the wing.
Another good suggestion that I have, as far as mounting your radio in your plane, is to mount the servos as securely as you can in the fuselage. What this means is NOT to use 'Foam Tape' or some other kind of tape to 'stick' those servos to the sides or bottom of the fuselage, rather I recommend that you install two 'rails' of hard balsa or spruce between the fuselage sides and use the small screws and grommets (those little rubber 'donuts' that come with your servos) to screw the servos down to these rails. I've seen many a plane lose control in the air (especially right after a hard landing, followed by a quick re-launch or too many loops) where the servos have come loose from the foam tape and now the rudder and/or elevator no longer move when you move the transmitter controls. Instead, the servos move around in the fuselage and don't push or pull on the control rods. I'd NEVER use foam tape to mount servos in a plane that had an engine as the vibration can tear the servos right from the tape in the air in seconds.
After installing your radio, but before you go out and toss your plane, doubly make sure that the plane control surfaces, i.e. the rudder, elevator, move in the direction you expect when you move the transmitter control sticks.
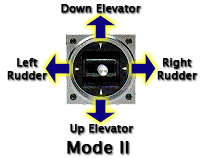 In the USA, most flyers use Mode II as the preferred way to setup their radios.
What this means is that the right stick on the transmitter is set up so that movement
on the stick produces movement on the plane following the diagram on the right.
In the USA, most flyers use Mode II as the preferred way to setup their radios.
What this means is that the right stick on the transmitter is set up so that movement
on the stick produces movement on the plane following the diagram on the right.
For rudder, you want the surface to move to the right (when looking from the back or tail of the plane towards the front) when the transmitter rudder stick is moved to the right. For elevator, you want it so that when you pull back (towards yourself) on the elevator stick, the elevator on the plane moves up. If you don't do this, the plane won't turn in the direction you expect when you try to control it and no one else at the flying will be able to help you fly it either. Have someone check it out first if you can.